3D Printing with wood fiber PLA
As a woodworker, I like the idea of being able to print with wood fiber embedded filament. A few of the YouTube videos I have watched on the subject have been very creative, notably this one by The Swedish Maker. The final prints are sandable and take stain reasonably well.
Unfortunately, wood fiber filament is notoriously difficult to work with. The material is brittle and many people have issues with stringing, the wispy strands that form as the print nozzle moves from one part of the print to a new part. I found a well reviewed (as much as Amazon reviews can be trusted) wood filament and proceeded to print a small part and ended up stopping it long before it finished. The stringing and layer quality were abysmal. Thus began a series of experimental prints in order to find a good profile for using this filament.
Before getting into the experiments, here is my setup. I have a Creality Ender 3 v2 printer with the stock 0.4 mm nozzle and hotend. I’ve replaced the glass bed plate with a flexible magnetic plate. The extra magnetic layer means I tend to run the bed at a higher temperature than others might use. I also like to print PETG filament and I want to be able to print ABS, both of which require higher nozzle temperatures. For that, I upgraded the Bowden tube to a more tolerant PTFE one. I also made a hack that prevents the tube from ever slipping away from the hotend, as it can do during high retraction prints. Finally, I installed Creality’s auto bed leveling sensor. The last one isn’t important for this work but it does give me spot-on bed adhesion for most of the work I do.
No matter what software slicer one uses, there are dozens of settings that govern the quality of a 3D print. I use Ultamaker Cura. It is freely available and came with a default set of filament profiles for my printer. It also had a hardware profile for my printer (and for most others on the market). I primarily use PLA in my prints, often use PETG, and PLA+ recently. For these, I have separate profiles that I have tuned to the point where I get consistently great print results. The wood filament I purchased is from Sunlu and is based on PLA. Therefore, I started with my default PLA profile and commenced developing a specific wood-PLA profile from there. Stringing is the issue I want to deal with and the following settings are the ones that I varied throughout this parameter search. Again, this is using the stock brass 0.4 mm nozzle.
Parameters of Interest
| Parameter Name | Default PLA Value |
| Layer Height | 0.16 mm |
| Print Speed | 80 mm/s |
| Nozzle Temperature | 220ºC |
| Bed Temperature | 60ºC |
| Retraction Distance | 5.5 mm |
| Retraction Speed | 45 mm/s |
| Z Hop Enabled | No |
| Outer Wall Wipe Distance | 0.0 mm |
| Wipe Between Layers Enabled | No |
Most of these terms should be familiar to you. For those who haven’t dealt with stringing issues, retraction may be a new concept. Retraction is when the extruder pulls the filament away from the hotend to remove the pressure and to temporarily stop pushing filament out of the nozzle. It does this very quickly and for a short distance (customizable) between moving on to other parts of the body being printed. This helps to reduce any blob build-up as well as strings during printing. With retraction enabled you get better quality prints at the expense of the time involved in performing the retraction. More distance or slower retraction rates will increase overall print time.
Z Hop When Retracted is a setting I’ve only just discovered. With this setting enabled, whenever retraction is taking place, the nozzle will lift a bit above the part when moving to other areas before printing resumes. It does this to avoid leaving any excess filament (blobs and strands) or from scratching the surface. I’ve been getting good quality prints without it enabled which is why I hadn’t heard of it before now. As with the retraction setting, enabling this also increases overall print time.
Outer Wall Wipe Distance is a setting that kicks in whenever the nozzle is printing an outer wall of an object. With the setting set to a value great than zero, the nozzle will travel this distance over an already completed wall to help drain the nozzle of excess material. The extruder also stops feeding the nozzle. This will therefore reduce blobbing and stringing when the nozzle moves to another region. It also increases print time, of course. Before now, my default setting was 0.0 mm. I had never had any reason to change it. It surprisingly helps a lot for stringy filament.
Finally, Wipe Nozzle Between Layers is a setting I thought might have something to do with creating clean prints, and it does, but not in the way I first understood it. It was only used for the last failed test print. The purpose of this (for now) experimental setting in Cura is to force the nozzle to slide over to a specified X-coordinate and wipe the nozzle on a brush, for cleaning, before starting the next print layer. I didn’t have a brush and when looking at this in action, thought it was a curious that the nozzle basically did a little shimmy in place between layers. It slightly worsened the print in my case but again, I didn’t have it set up correctly. I’m including it here for those also wondering what it does.
The Test Prints
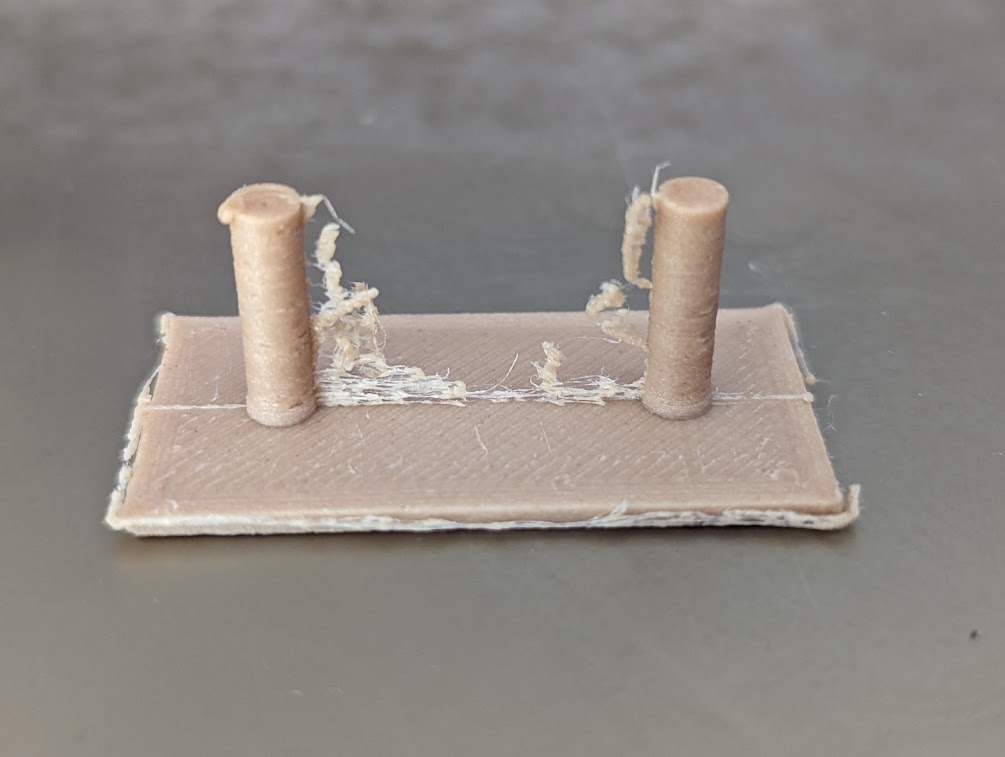
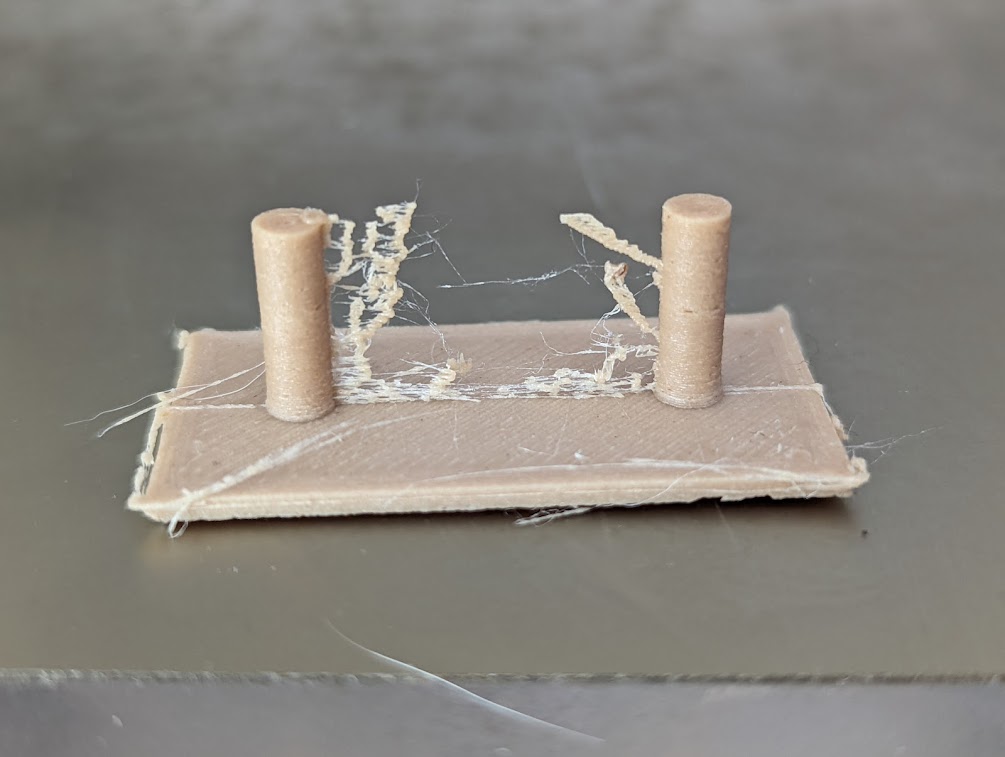
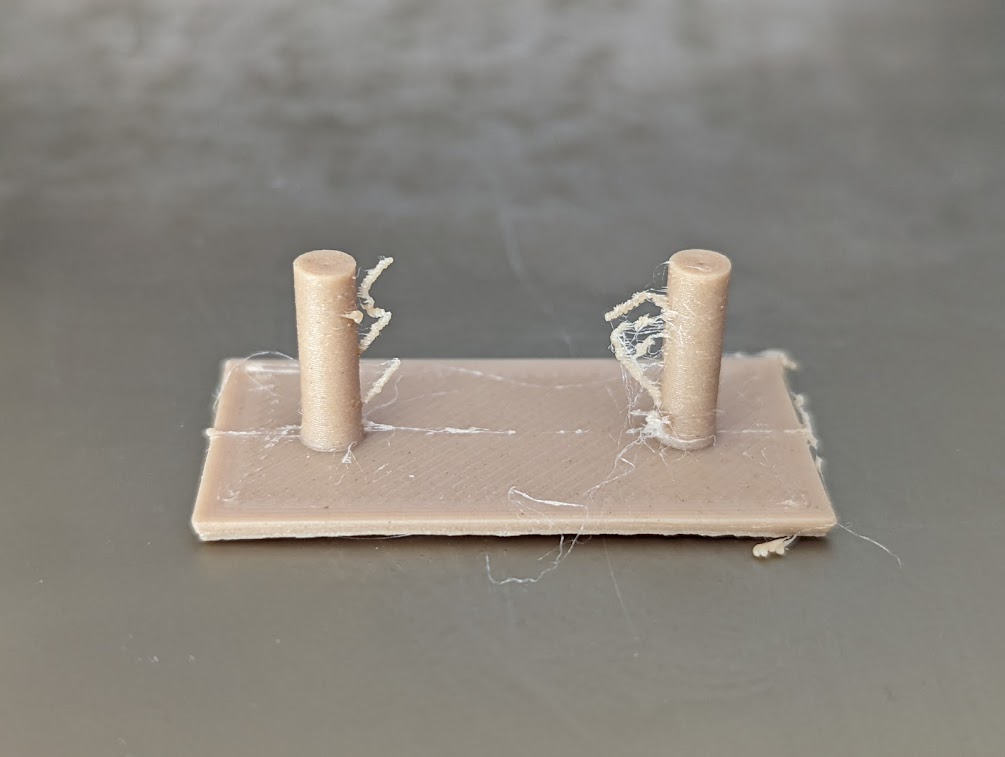
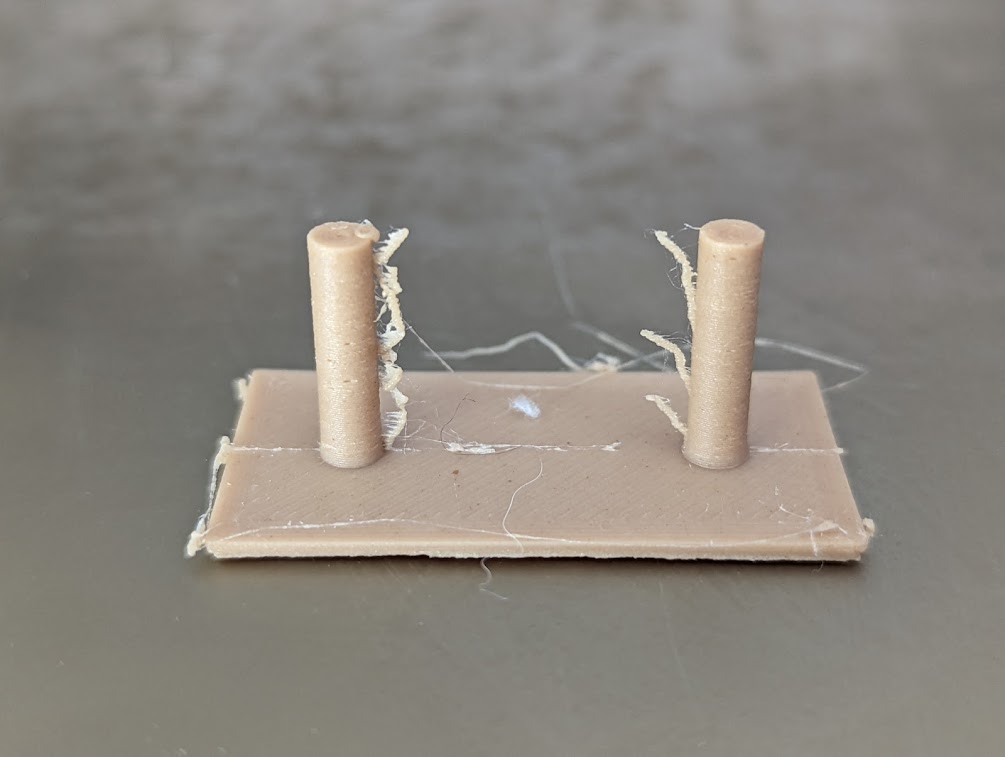
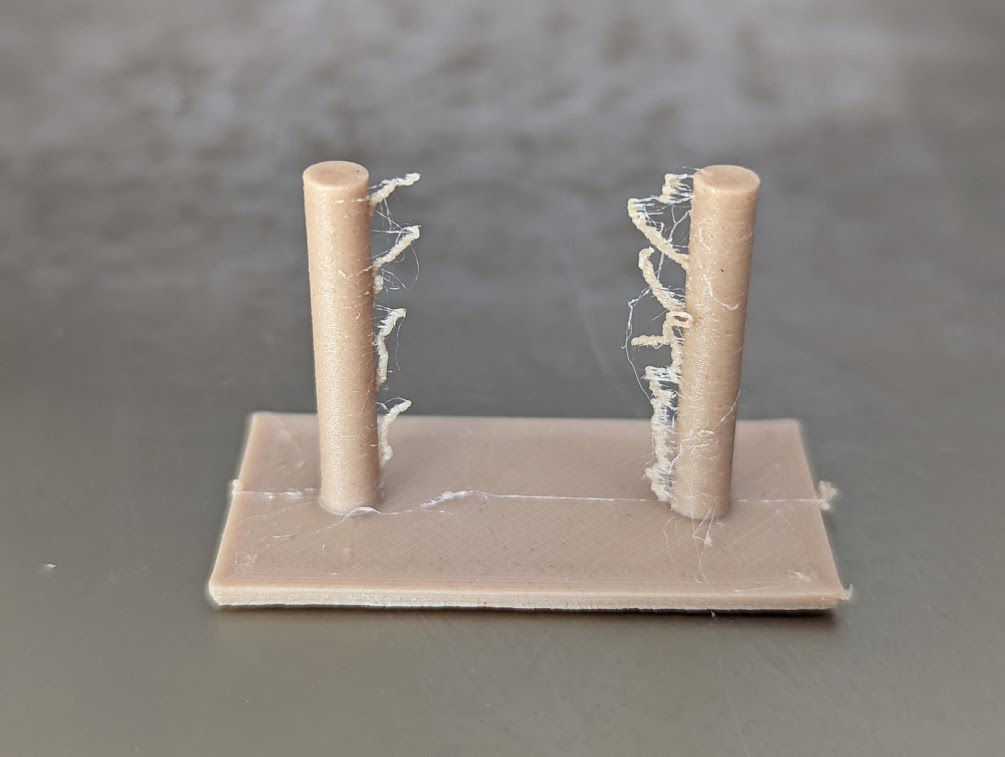
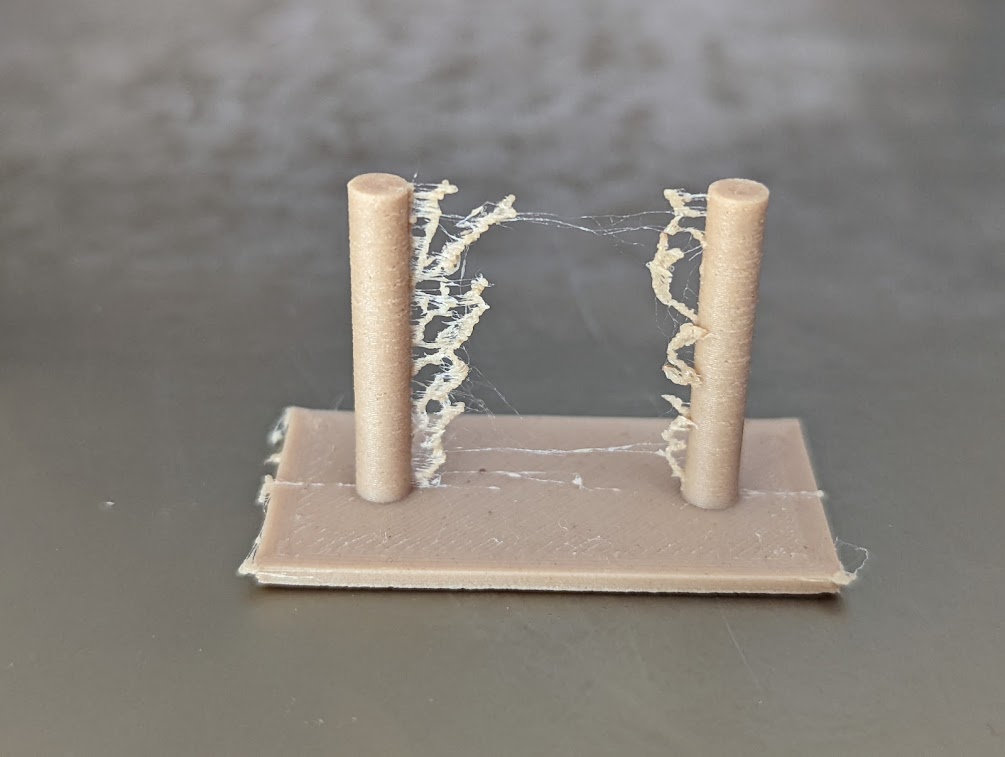
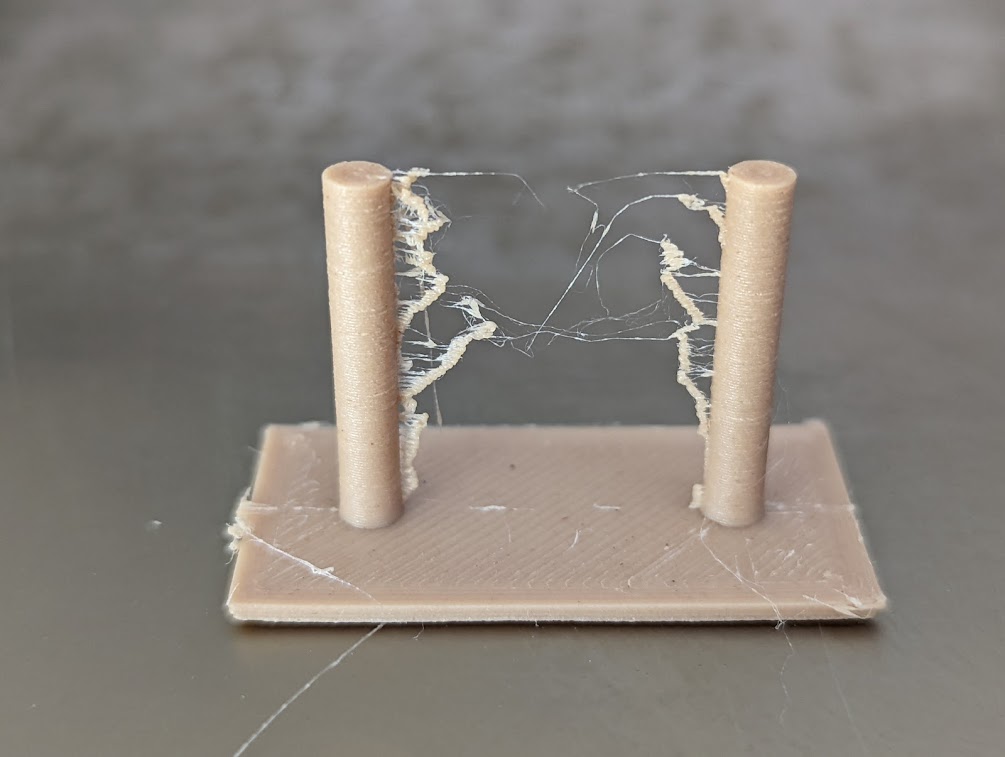
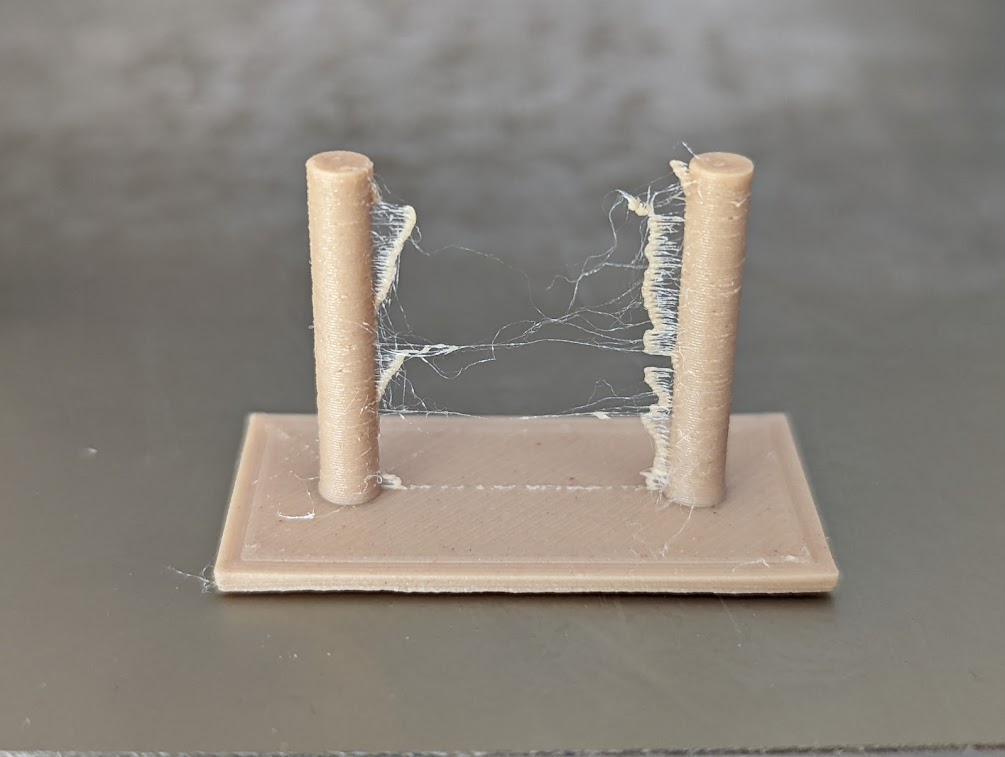
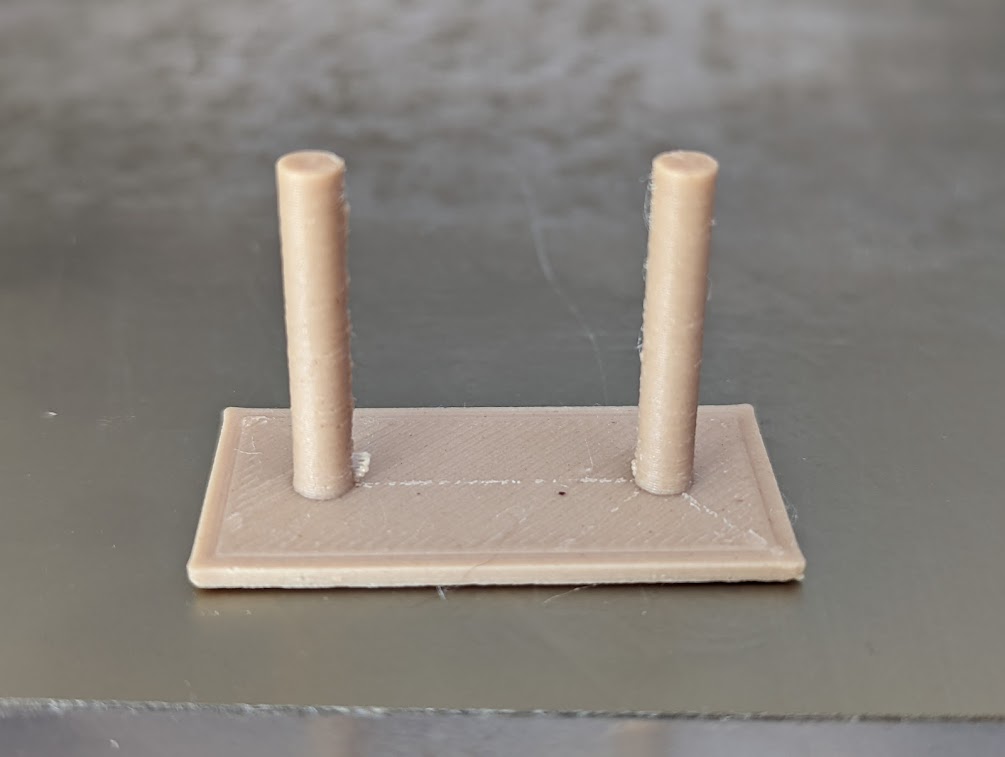
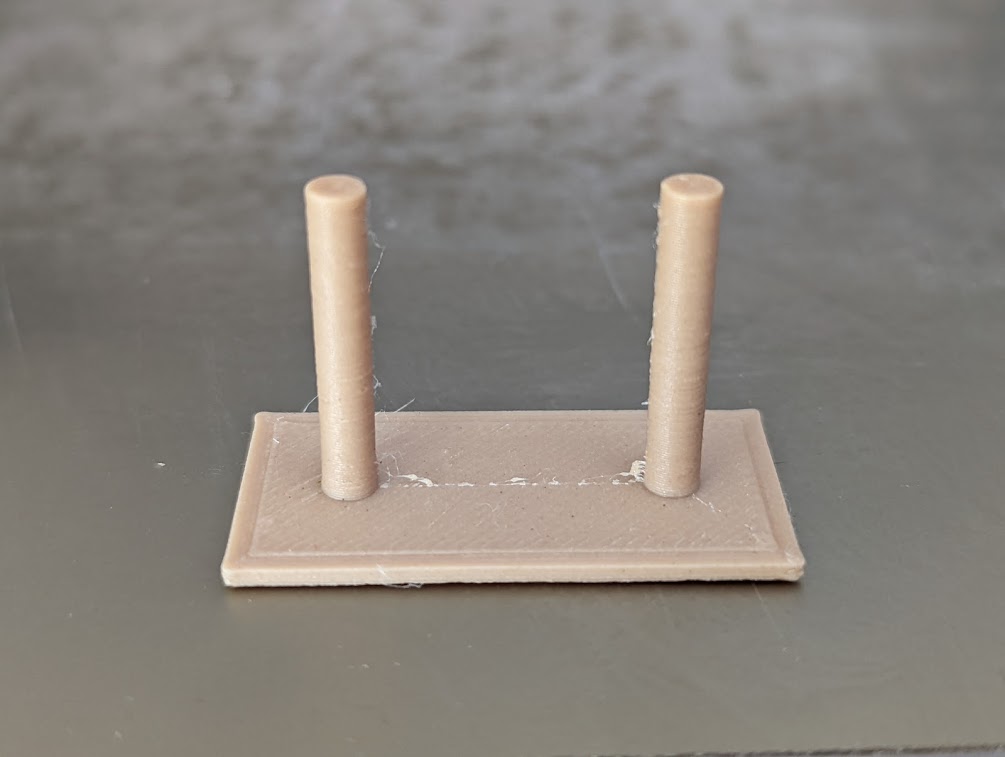
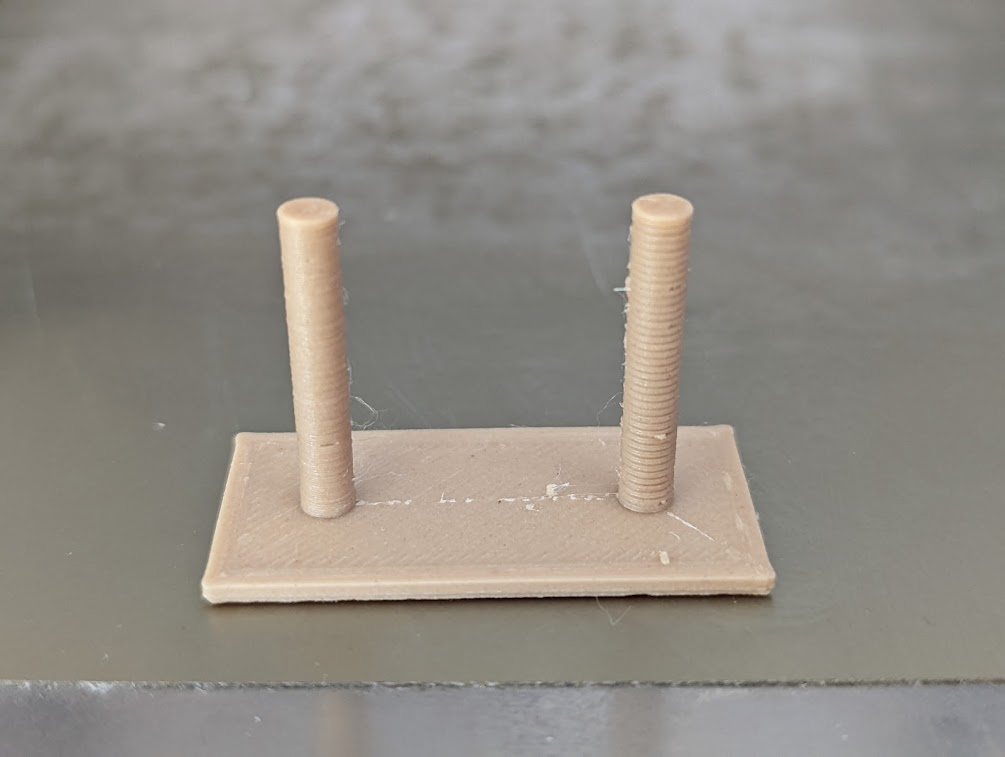
I’m printing the Basic String Test object found on Thingiverse. It is a simple piece consisting of a thin base and two small towers. These objects tend to exacerbate string issues because once the nozzle is at the height to print the towers, it has small areas to print before moving on to the next tower. You can see this in most of the images below. Each print would take between 40 to 90 minutes, depending on the settings. For some of them, I stopped the printing when I realized a trial was not going to be successful. Unfortunately, I wasn’t able to spend my entire time watching the prints, so most of them did complete while I was off doing other things. (Side note: This makes a great case for installing a monitoring tool like OctoPrint. A project for the new year.)
In all, 12 prints were made with one showing very promising, acceptable results, Trial 10 below. The table shows each of the trials with a link to a higher res image as well as the print settings used.
String Test Prints
 |
 |
 |
 |
 |
 |
 |
 |
 |
 |
 |
 |
|
| Trial | 1 | 2 | 3 | 4 | 5 | 6 | 7 | 8 | 9 | 10 | 11 | 12 |
| Layer Height | 0.16 mm | 0.16 mm | 0.16 mm | 0.16 mm | 0.16 mm | 0.16 mm | 0.16 mm | 0.20 mm | 0.20 mm | 0.20 mm | 0.20 mm | 0.20 mm |
| Print Speed | 80 mm/s | 80 mm/s | 80 mm/s | 50 mm/s | 40 mm/s | 80 mm/s | 80 mm/s | 50 mm/s | 50 mm/s | 80 mm/s | 80 mm/s | 80 mm/s |
| Nozzle Temp | 220ºC | 210ºC | 200ºC | 200ºC | 200ºC | 200ºC | 200ºC | 200ºC | 200ºC | 200ºC | 200ºC | 200ºC |
| Bed Temp | 60ºC | 60ºC | 55ºC | 55ºC | 55ºC | 60ºC | 60ºC | 60ºC | 60ºC | 60ºC | 60ºC | 60ºC |
| Retraction Distance | 5.5 mm | 5.5 mm | 6.0 mm | 6.0 mm | 6.0 mm | 7.0 mm | 4.0 mm | 3.0 mm | 5.0 mm | 6.0 mm | 6.0 mm | 6.0 mm |
| Retraction Speed | 45 mm/s | 45 mm/s | 50 mm/s | 50 mm/s | 60 mm/s | 50 mm/s | 50 mm/s | 50 mm/s | 45 mm/s | 50 mm/s | 50 mm/s | 50 mm/s |
| Z Hop | ✓ | ✓ | ✓ | ✓ | ||||||||
| Outer Wall Wipe Distance | 0.0 mm | 0.0 mm | 0.0 mm | 0.0 mm | 0.0 mm | 0.0 mm | 0.0 mm | 0.0 mm | 0.0 mm | 0.2 mm | 0.3 mm | 0.2 mm |
| Wipe Between Layers | ✓ |
As mentioned at the top, I started with my default PLA settings (Trial 1). This gave horrible results and I then tried lowering the nozzle temperature to see if that had any effect (Trials 2 and 3). 200ºC is about the lowest I could get without having the nozzle clog up. At this point, I started to alter print speed as well as retraction settings. None of the settings I tried seem to make any difference at all (Trials 4–8). Around that time I had learned of the Z Hop setting and enabled it for Trial 9 but that achieved only noticeable improvement. Finally, I learned of the Outer Wall Wipe Distance setting based on a comment from a fellow Redditor. The suggested value for this distance is 0.2–0.4 mm so I set it at 0.2 mm for Trial 10 and had immediate success. This is the cleanest print I was able to obtain for this wood PLA filament. For Trial 11 I changed the Outer Wall Wipe Distance to 0.3 mm, leaving everything else the same. Some very noticeable stringing reappeared but was still better than previous results. Finally, I checked the experimental option Wipe Nozzle Between Layers while keeping the rest of the settings the same as in Trial 10. This had very adverse effects but, as mentioned, this isn’t a setting one should be using for this purpose. Note in particular the wonky right-hand tower of Trial 12. This was the end the nozzle would wipe itself over after every layer. Since nothing was brushing or cleaning the nozzle, and there were no particular settings to do so, I think it affected the layer quality rather poorly.
I now have a good profile for printing wood-PLA filament. The print speed of 80 mm/s is right where I started from, which pleases me somewhat. The Z-hopping and extra wall wipes will increase overall printing times but I can live with that. Time to give it a better test.
Recent Comments