The Hackintosh, Part 1: Requirements
I wanted a new photography workstation. My 4 year old 24″ iMac has become noticeably slow as the size of images I work with has grown over the last few years. It is still a nice machine but it is maxed out as far as upgrades go, not that it had much room to grow.
The problem is that upgrading to the latest version of the iMac would have given me similar limitations as well as the hefty Apple price and what I really wanted was a Mac Pro system anyway. Here’s the bottom-level CPU version I spec’d and priced.
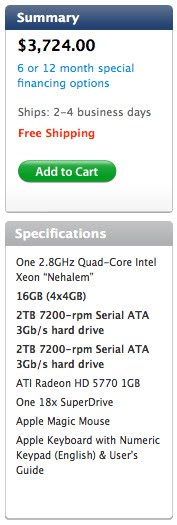
Apple Mac Pro Specs, early 2011
$3,724 and it doesn’t even include a monitor. Throw in another $1,000 for Apple’s 27″ display and the price tops out at $4,724. That’s more than I wanted to spend so I went with Option 2 – build a Macintosh system myself. This means purchasing the components to build a typical PC but installing Apple’s Snow Leopard operating system on it instead of Linux or Windows or some other OS. Why is this important? Because I’m heavily invested in Adobe and other photographic software packages for the Mac and switching to a Microsoft platform would cost even more than buying new Apple hardware. Also, as much as I love the idea of open source software and Linux I’ve not seen anything yet that comes close to what I can do (with little programming know-how) with Photoshop[1].
The systems are known as Hackintoshes and there are a number of people out there building them and giving feedback on how to do so. Enough that I felt I could do this with little to no experimentation and I was right.
What follows is straight-forward write-up of what I did to build my system. At the end I give references I found helpful or for which you may find helpful if you decide to do this.
Finally, I want to point out that if you aren’t into playing with hardware (installing a stock motherboard into a bare metal chassis, connecting the CPU, power supply, memory modules, etc) then this may not be your thing. However, there are a number of how-to items in the referenced sites that deal with installing the Mac OS on non-Apple notebook computers. There are a few stock PC systems from, say, Dell, that are also amenable to installing the Mac OS with not too much trouble but you have to dig to find instructions, then find out of the system is still available for purchase and finally look at all the quirks that happen because the system isn’t matched perfectly to the Apple hardware requirements.
With all that out of the way here is the system I decided to build. It is based around the Intel quad core i7-870 CPU on an ASUS P7P55D-E Pro motherboard. The motherboard is relatively old compared to the new i7 CPU but it is well known among Hackintosh community as being a very friendly board to build from. The board also allowed for my design goal of 16GB total memory. It has more USB ports than I know what to do with (12 USB2 and 2 USB3), sufficient Firewire ports and external and internal SATA ports. The system has four 4GB Corsair DDR3 memory modules (16GB total memory), an EVGA GeForce 9500 GT 1GB video card, two internal 2TB Samsung 5400rpm hard drives, a basic CD/DVD burner and all packed inside a roomy Antec Sonata III case with 500W power supply.
As for the display I was set to go with something like Apple’s 27″ LCD or similar but then I came across an Engadget review of the Asus PA246Q monitor. Without costing a fortune this unit covers 98% of the Adobe RGB color space (well known by any photographer and digital printer) and allows for very accurate color reproduction.
I bought everything but the monitor from Newegg.com (they were out of stock on the Monitor). The monitor I ended up buying from Amazon.com. Both outfits gave me free shipping. Below is the cost breakdown and grand sum total for this system, with links to Newegg.com[2] since I like them so much.
[table th=”0″ width=”500px” class=”table table-bordered” colalign=”left|right”]
ASUS P7P55D-E Pro motherboard, $180
Intel Quad-Core i7-870 CPU, $290
Corsair 8GB (2 x 4GB) DDR3 memory kit ( x 2 for 16GB total), $198
EVGA GeForce 9500 GT 1GB video card, $70
Samsung 2TB SATA hard drives (x 2), $160
Lite-On CD/DVD +R/RL -R/RL +/-DL Drive, $21
Antec Sonata III case with 500W power supply, $140
ASUS PA246Q 24″ LCD monitor, $500
Total, $1559
[/table]
That’s 33% of the cost of the previously spec’d Apple system! Things aren’t exactly equal. Instead of the workhorse Xeon processor I have a not-too-shabby i7. I’ll never notice the slight performance difference. Instead of the 7200 RPM hard drives Apple sells I have 5400 RPM drives. I’m not doing video editing or tasks requiring high I/O throughput so again, I won’t notice the difference. The video card has dual DVI outputs so I can, in theory, add a second monitor at a later date. I plan to.
If this price seems rather high to you – and it should since modern setups you can purchase at Best Buy and Wal*Mart sell below a $1,000 these days – just remember that I wanted a high-end system for detailed photography work.
You can save some money by building a system with only 8GB memory, a single and smaller sized internal hard drive and a lesser quality monitor. I saw numerous 22″ – 24″ HD monitors in the $150 price range in fact. None of them would work for my needs but would make great monitors even for a gaming system.
So you could, using the how-to info from Part 2 of this post, build your own Hackintosh system for around $900 and still have room to upgrade at some future date.
[1] OK, so I also have a sizable iTunes archive and general love for the stability of the Apple OS that provides sufficient barrier to moving to any other OS.
[2] March 2016 update: Links were removed since most of these parts are no longer available.
Recent Comments